 Now that everyone is teaching online, active learning strategies like minute papers and muddiest point are hard to manage spontaneously. In a campus classroom, you can ask everyone to share responses out loud or on a piece of paper. In an asynchronous online class, students aren’t able to participate in quite the same way.
Google Forms can give you a quick and easy solution. Create a form with the question you want to use to begin a presentation or demonstration, students respond using the form, and you use their responses to frame your presentation.
Create Your Form
- Log into your Google Drive account.
- Create a new Google Forms file, using Google Help if you need more details.
- Give the form file a straightforward title (such as “Presentation Topic Survey”).
- Add a description or explanation if desired. I added details on how I would use the survey.
- Change the question type, if necessary. I changed the question to “Paragraph” so that student have room to write a few sentences as their response.
- Add the one question that you want students to respond to. I used the question “What topic have you chosen for your presentation? Give me specific details in a sentence or two.”
- If desired, click the Palette icon on the upper right and customize the appearance of the form.
My example Presentation Topic Survey shows what the resulting form looks like. You will notice that I added a second question asking students for contact information if they wanted a personal response. That step is completely optional.
Share Your Form
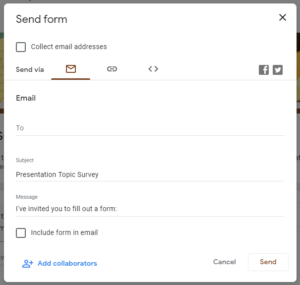
- Click the large SEND button in the upper right corner of the page. The options shown in the screenshot below will appear:

- Choose one of the following options to share your form:
- Click the envelope icon to send the form to students by email, and fill out the remainder of the SEND form accordingly.
- Click the link icon to copy a hyperlink to the form that you can share with students.
- Click the angled brackets icon to copy the code that you can use to embed the form on another webpage.
- Click the Facebook icon or the Twitter icon to share the form on social media.
Prepare for Class
- Log into your Google Drive account.
- Open the Google Form that you created.
- Click the “Responses” link at the top of the form.
- Use the Google Help instructions to view the responses in a variety of ways.
- Review students’ responses just as you would review answers they shared on paper.
- If desired, remove any answers that do not meet the requirements or focus of the assignment.
- Look for patterns to address with the class. In my example, I would look for answers that were strong and specifically focused to highlight. I would also look for those topics that could be improved by focusing more specifically.
- Copy the responses to a word processor file, if desired, to share the answers with the class.
- Choose two or three strong examples and a few examples to demonstrate how to improve the responses.
Use the Responses in Your Video
- Prepare to create a lesson to share with students. This post will focus on producing a 5 to 7 minute video. You could also create a handout or audio recording.
- Begin your video session in a synchronous forum like Zoom or using your favorite video recorder to share asynchronously.
- Open your video by referring to students’ responses. You can share a link to the responses or a link to the word processor document you created with the responses.
- Review the qualities of a strong response. For my example, I would talk about how a strong topic is specific and well-focused.
- Point out strong responses and explain why they succeed.
- Review weaker or incorrect responses and demonstrate how to improve them.
- End your video by reviewing the qualities of a strong response.
- If desired, give students a follow-up activity to complete:
- For synchronous meetings, ask students to share ways they can improve their responses in light of the examples.
- For asynchronous videos, have students share their ways to improve responses in a discussion forum or email.
Photo credit: Jumpstart cables by Michael Pedersen on Flickr, used under a CC-BY 2.0 license.